前言
本文介绍如何实现一个Linux虚拟容器,使人深刻了解虚拟容器技术的底层原理。文中的示例代码在github仓库
首先,了解容器是什么,它能做什么
容器是就是虚拟化的一种轻量级技术,例如,在Linux系统上迅速创建一个容器(类似虚拟机)并在容器上部署和运行应用程序,并通过配置文件可以轻松实现应用程序的自动化安装、部署和升级。
虚拟容器的要点
虚拟化需要隔离资源
虚拟机内部是一个独立的隔离环境,比如磁盘、用户、网络等资源都需要独立,与宿主机、其他虚拟机隔离开。
Linux 提供的一种内核级别环境隔离的方法——Namespace,可以隔离不同的资源,有以下种类
- Mount Namespaces
- UTS Namespaces
- IPC Namespaces
- PID Namespaces
- Network Namespaces
- User Namespaces
更多在 Linux 虚拟容器系列——认识Namespace 了解
运行容器需要桥梁
虚拟网桥…
容器的运行资源的限制
cgroup…
实践过程
这里我们用最简单的 C 语言来编写一个虚拟化容器环境,C语言简单明了,容易理解,最后,为了更便于使用,我还会改写为 C++ 代码。
准备一个容器
我们需要一个什么样的容器,本文的目标是编写一个简单的虚拟环境,这么该容器的意义在于测试环境是否符合要求,将会使用到一些命令,如 ls, cd, ps 等
如何准备命令程序,我可不想一个个查找代码和静态编译,于是乎,我使用 busybox 这个瑞士军刀
百科: BusyBox 是款整合了多种常用linux命令和工具的应用程序。BusyBox 包含了某些简单的工具,例如 cat 和 echo,还包含了其他更强大、更复杂的工具,例如 grep、find、mount 以及 telnet。
busybox 下载代码,静态编译后,只有一个静态可执行文件,它的 make all 选项可以帮助你建立一个仿佛 unix 的目录结构,在 bin 目录下有各种命令名称的软连接文件,这些文件的目标都只有一个,就是 busybox, 执行这些命令时,busybox如何知道是什么命令呢,它是通过 C 的 main 函数传入的 argv 第 0 个字符串来判断命令的名称。
以下是我的执行过程:
- 在 https://busybox.net/ 上下载 busybox 最新版本的源代码
wget https://busybox.net/downloads/busybox-1.30.0.tar.bz2
- 解压
tar -xvf busybox-1.30.0.tar.bz2
- 使用默认编译选项
cd busybox-1.30.0
make defconfig
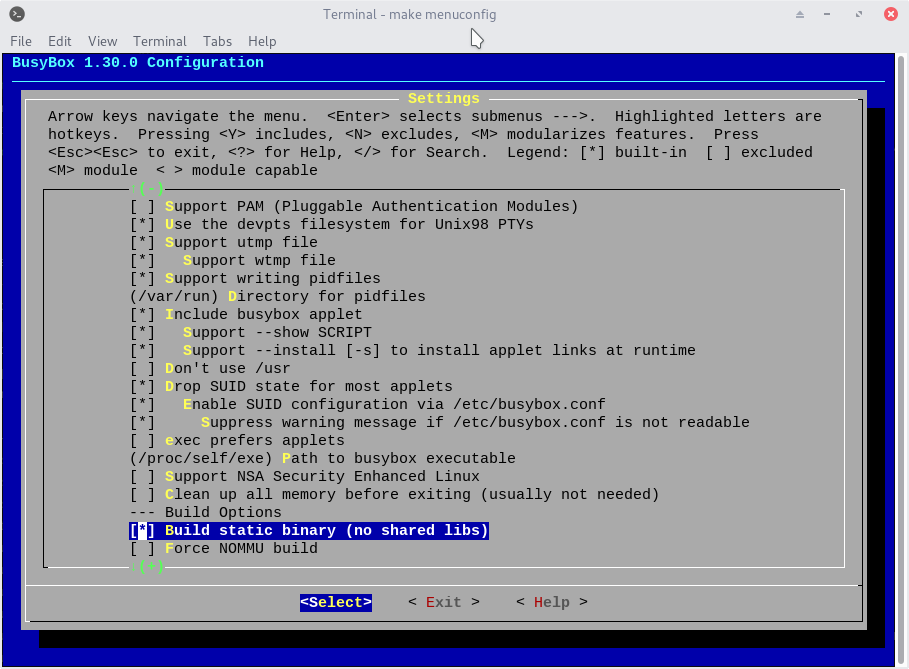
- 需要将 busybox 静态编译,进入
menuconfig界面,勾选setting - Build static binary (no shared libs),保存后推出
make menuconfig
- 进行编译,然后在新建的目录 _install 下生成类 unix 的目录结构
make
make install
- 查看目录结构
➜  busybox-1.30.0 tree -L 1 _install
_install
├── bin
├── linuxrc -> bin/busybox
├── sbin
└── usr
- 查看 bin 下的命令
➜  busybox-1.30.0 tree -L 2 _install
_install
├── bin
│   ├── arch -> busybox
│   ├── ash -> busybox
│   ├── base64 -> busybox
│   ├── busybox
│   ├── cat -> busybox
│   ├── chattr -> busybox
│   ├── chgrp -> busybox
│   ├── chmod -> busybox
│   ├── chown -> busybox
│   ├── conspy -> busybox
│   ├── cp -> busybox
│   ├── cpio -> busybox
│   ├── cttyhack -> busybox
│   ├── date -> busybox
- busybox 生成的 root 目录,还是跟 unix 标准目录有点差别,为了下面步骤,我们多新建两个子目录,sys 与 proc
mkdir sys proc
➜  _install tree -L 1 .
.
├── bin
├── linuxrc -> bin/busybox
├── proc
├── sbin
├── sys
└── usr
- 至此,一个具备简单目录结构与命令集合的容器,准备完成
简单容器的 C 语言例子
以下编写一个简单的C语言例子,只有70行,在上面 busybox 的_install目录作为容器的根目录,创建诸多新的 namespace 并运行一个子进程,在子进程中执行 shell,整个过程类似于 docker run -it centos:7 /bin/sh
#include <sys/wait.h>   // waitpid
#include <sys/mount.h>  // mount
#include <fcntl.h>      // open
#include <unistd.h>     // execv, sethostname, chroot, fchdir
#include <linux/sched.h> /* or #include <sched.h> */
#include <signal.h>
#include <string.h>
#include <stdio.h>

char *container_dir = "../busybox_root";
char *container_hostname = "a-simple-container";
int container_stack_size = 1 << 20; // 1024 * 1024

int container_process(){
    printf("Launch container\n");

    int status_code;

    // 切换cwd到某个目录下
    status_code = chdir(container_dir);
    if(status_code<0){
        printf("chdir err, status_code=%d\n", status_code);
        return status_code;
    }

    // 直接使用当前目录作为根目录
    status_code = chroot(".");
    if(status_code<0){
        printf("chroot err, status_code=%d\n", status_code);
        return status_code;
    }

    // 设置容器主机名
    status_code = sethostname(container_hostname, strlen(container_hostname));
    if(status_code<0){
        printf("sethostname err, status_code=%d\n", status_code);
        return status_code;
    }

    // 设置独立的进程空间,挂载 proc 文件系统
    mount("none", "/proc", "proc", 0, NULL);
    mount("none", "/sys", "sysfs", 0, NULL);

    // 启动 shell
    char * const cmd[] = {"/bin/sh", NULL};
    status_code = execv(cmd[0], cmd);

    umount2("/proc", MNT_FORCE);
    umount2("/sys", MNT_FORCE);

    return status_code;
}

int main(int argc, char** argv) {
    int status_code;

    // 子进程栈
    char child_stack[container_stack_size];
    int child_pid = clone(&container_process, child_stack+container_stack_size, // 移动到栈底
                        // 使用新的 namespace 后,执行需要 sudo 权限
                        CLONE_NEWNS|        // new Mount 设置单独的文件系统
                        // CLONE_NEWNET|    // new Net namespace
                        CLONE_NEWUTS|       // new UTS namespace hostname
                        CLONE_NEWPID|       // new PID namaspace,表现为:在容器里使用 ps 会只看到容器进程(祖先)的子孙进程,且进程id数值较小
                        SIGCHLD);           // 子进程退出时会发出信号给父进程

    if(child_pid < 0){
        printf("clone err, child_pid=%d\n", child_pid);
        return -1;
    }

    waitpid(child_pid, &status_code, 0); // 等待子进程的退出

    return status_code;
}
注意在上面代码中,我注释了 CLONE_NEWNET 的 flag,因为我需要在后面的步骤中在 shell 脚本打开的 net namespace 运行这个容器。
编译并执行,注意:创建 namespace 的系统调用需要 root 权限:
gcc main.c -o linux-container.out
sudo ./linux-container.out
在容器执行的 shell 中执行一些 busybox 提供的命令,体验下容器的环境,查看容器的主机名,内部 namespace 与宿主机的异同
Launch container
/ # uname -n
a-simple-container
/ # ps -ef
PID   USER     TIME  COMMAND
    1 0         0:00 /bin/sh
    3 0         0:00 ps -ef
/ # ls
bin      linuxrc  proc     sbin     sys      usr
/ # ls /proc/
1              cgroups        devices        filesystems    kallsyms       kpagecount     misc           partitions     softirqs       thread-self    vmstat
5              cmdline        diskstats      fs             kcore          kpageflags     modules        sched_debug    stat           timer_list     zoneinfo
acpi           config.gz      dma            interrupts     key-users      latency_stats  mounts         schedstat      swaps          tty
asound         consoles       driver         iomem          keys           loadavg        mtrr           scsi           sys            uptime
buddyinfo      cpuinfo        execdomains    ioports        kmsg           locks          net            self           sysrq-trigger  version
bus            crypto         fb             irq            kpagecgroup    meminfo        pagetypeinfo   slabinfo       sysvipc        vmallocinfo
/ # ls -l /proc/1/ns
total 0
lrwxrwxrwx    1 0        0                0 Jan  6 11:23 cgroup -> cgroup:[4026531835]
lrwxrwxrwx    1 0        0                0 Jan  6 11:23 ipc -> ipc:[4026531839]
lrwxrwxrwx    1 0        0                0 Jan  6 11:23 mnt -> mnt:[4026532515]
lrwxrwxrwx    1 0        0                0 Jan  6 11:23 net -> net:[4026532008]
lrwxrwxrwx    1 0        0                0 Jan  6 11:23 pid -> pid:[4026532519]
lrwxrwxrwx    1 0        0                0 Jan  6 11:23 pid_for_children -> pid:[4026532519]
lrwxrwxrwx    1 0        0                0 Jan  6 11:23 user -> user:[4026531837]
lrwxrwxrwx    1 0        0                0 Jan  6 11:23 uts -> uts:[4026532516]
/ # exit
退出来,在宿主机中查看shell进程的 namespace,与上面对比,看哪些 inode 编号不一致
Tip: $$ 变量是当前 shell 的 pid
➜ ls -l /proc/$$/ns
total 0
lrwxrwxrwx 1 lightfish lightfish 0 2月   6 19:32 cgroup -> 'cgroup:[4026531835]'
lrwxrwxrwx 1 lightfish lightfish 0 2月   6 19:32 ipc -> 'ipc:[4026531839]'
lrwxrwxrwx 1 lightfish lightfish 0 2月   6 19:32 mnt -> 'mnt:[4026531840]'
lrwxrwxrwx 1 lightfish lightfish 0 2月   6 15:41 net -> 'net:[4026532008]'
lrwxrwxrwx 1 lightfish lightfish 0 2月   6 19:32 pid -> 'pid:[4026531836]'
lrwxrwxrwx 1 lightfish lightfish 0 2月   6 19:32 pid_for_children -> 'pid:[4026531836]'
lrwxrwxrwx 1 lightfish lightfish 0 2月   6 19:32 user -> 'user:[4026531837]'
lrwxrwxrwx 1 lightfish lightfish 0 2月   6 19:32 uts -> 'uts:[4026531838]'
从 inode 可以知道,目前,我们实现了 namespace 中 mnt, pid, user, uts 这四种资源的隔离,接下来,需要实现 net 的隔离
虚拟机网络
使用 C语言进行网络编程比较复杂,我使用 ip 命令编写 shell 脚本来构建一个简单的虚拟机网络环境:
脚本内容如下,注意需要 root 权限运行
#!/bin/sh

# set env
net_nums="0 1 2"
ip_prefix="10.0.1"
echo 1 > /proc/sys/net/ipv4/ip_forward
echo 1 > /proc/sys/net/ipv4/conf/default/accept_local
echo 0 > /proc/sys/net/ipv4/conf/default/rp_filter

# setup bridge br0
ip link add br0 type bridge
ip addr add $ip_prefix.0 dev br0
ip link set dev br0 up

## show br0 info
echo br0 ip:
ip addr show dev br0|grep -w inet
echo

# setup namespace
for i in $net_nums
do
ip netns add net$i
ip netns exec net$i ip link set dev lo up
ip link add veth$i type veth peer name veth_$i
ip link set veth_$i netns net$i
ip netns exec net$i ip link set dev veth_$i name ech0
ip netns exec net$i ip addr add $ip_prefix.$((i+1))/24 dev ech0
ip netns exec net$i ip link set dev ech0 up
ip link set dev veth$i master br0
ip link set dev veth$i up

## show namespace info
echo net$i ip route:
ip netns exec net$i ip route
echo
done

# show info
bridge link
echo

# test ping
for i in $net_nums
do
for j in $net_nums
do
echo net$i ping to net$j
ip netns exec net$i ping $ip_prefix.$((j+1)) -c 1 2>&1 | awk -F'/' 'END{ print (/^rtt/? "OK "$5" ms":"FAIL") }'
echo
done
done

# run my linux container
ip netns exec net0 ./linux-container.out

# clean
for i in $net_nums
do
ip link del veth$i
done
for i in $net_nums
do
ip netns delete net$i
done
ip link del br0
在上面创建的网络环境中,我将之前的写好的 C 程序在 net0 的 namespace 中执行,执行过程如下:
sudo ./netns-sample.sh
br0 ip:
    inet 10.0.1.0/32 scope global br0

net0 ip route:
10.0.1.0/24 dev ech0 proto kernel scope link src 10.0.1.1

net1 ip route:
10.0.1.0/24 dev ech0 proto kernel scope link src 10.0.1.2

net2 ip route:
10.0.1.0/24 dev ech0 proto kernel scope link src 10.0.1.3

53: veth0@if52: <BROADCAST,MULTICAST,UP,LOWER_UP> mtu 1500 master br0 state forwarding priority 32 cost 2
55: veth1@if54: <BROADCAST,MULTICAST,UP,LOWER_UP> mtu 1500 master br0 state forwarding priority 32 cost 2
57: veth2@if56: <BROADCAST,MULTICAST,UP,LOWER_UP> mtu 1500 master br0 state forwarding priority 32 cost 2

net0 ping to net0
OK 0.038 ms

net0 ping to net1
OK 0.087 ms

net0 ping to net2
OK 0.104 ms

net1 ping to net0
OK 0.063 ms

net1 ping to net1
OK 0.039 ms

net1 ping to net2
OK 0.089 ms

net2 ping to net0
OK 0.055 ms

net2 ping to net1
OK 0.045 ms

net2 ping to net2
OK 0.112 ms

Launch container
/ # ls -l /proc/1/ns/net
lrwxrwxrwx    1 0        0                0 Feb  6 11:50 /proc/1/ns/net -> net:[4026532516]
/ # ifconfig
ech0      Link encap:Ethernet  HWaddr BA:8A:C8:93:50:FE
          inet addr:10.0.1.1  Bcast:0.0.0.0  Mask:255.255.255.0
          inet6 addr: fe80::b88a:c8ff:fe93:50fe/64 Scope:Link
          UP BROADCAST RUNNING MULTICAST  MTU:1500  Metric:1
          RX packets:138 errors:0 dropped:0 overruns:0 frame:0
          TX packets:18 errors:0 dropped:0 overruns:0 carrier:0
          collisions:0 txqueuelen:1000
          RX bytes:15540 (15.1 KiB)  TX bytes:1356 (1.3 KiB)

lo        Link encap:Local Loopback
          inet addr:127.0.0.1  Mask:255.0.0.0
          inet6 addr: ::1/128 Scope:Host
          UP LOOPBACK RUNNING  MTU:65536  Metric:1
          RX packets:2 errors:0 dropped:0 overruns:0 frame:0
          TX packets:2 errors:0 dropped:0 overruns:0 carrier:0
          collisions:0 txqueuelen:1000
          RX bytes:168 (168.0 B)  TX bytes:168 (168.0 B)

/ # ping 8.8.8.8
PING 8.8.8.8 (8.8.8.8): 56 data bytes
ping: sendto: Network is unreachable
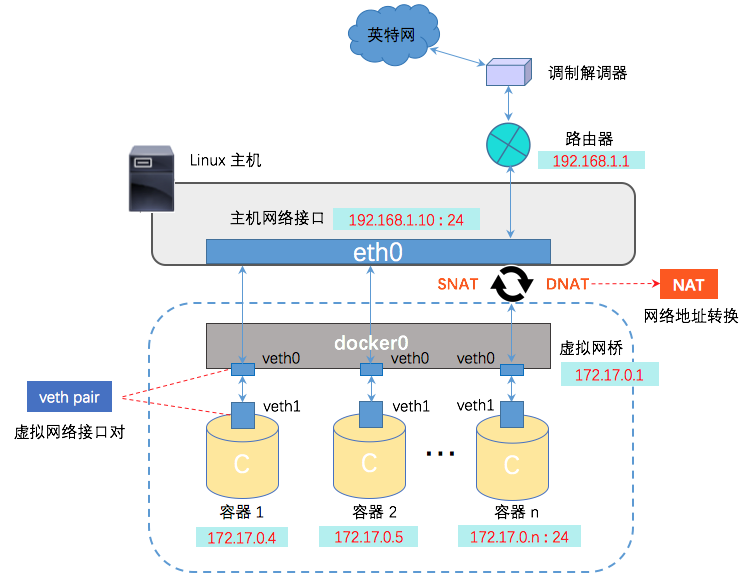
到了这一步,我完成了虚拟机局域网中运行容器,这里,由于虚拟网桥并没有联系物理网卡,容器还无法连上互联网,要实现每个 namespace 对外网的访问还需要额外的配置:设置默认网关,开启 ip_forward,为网络添加 NAT 规则等。
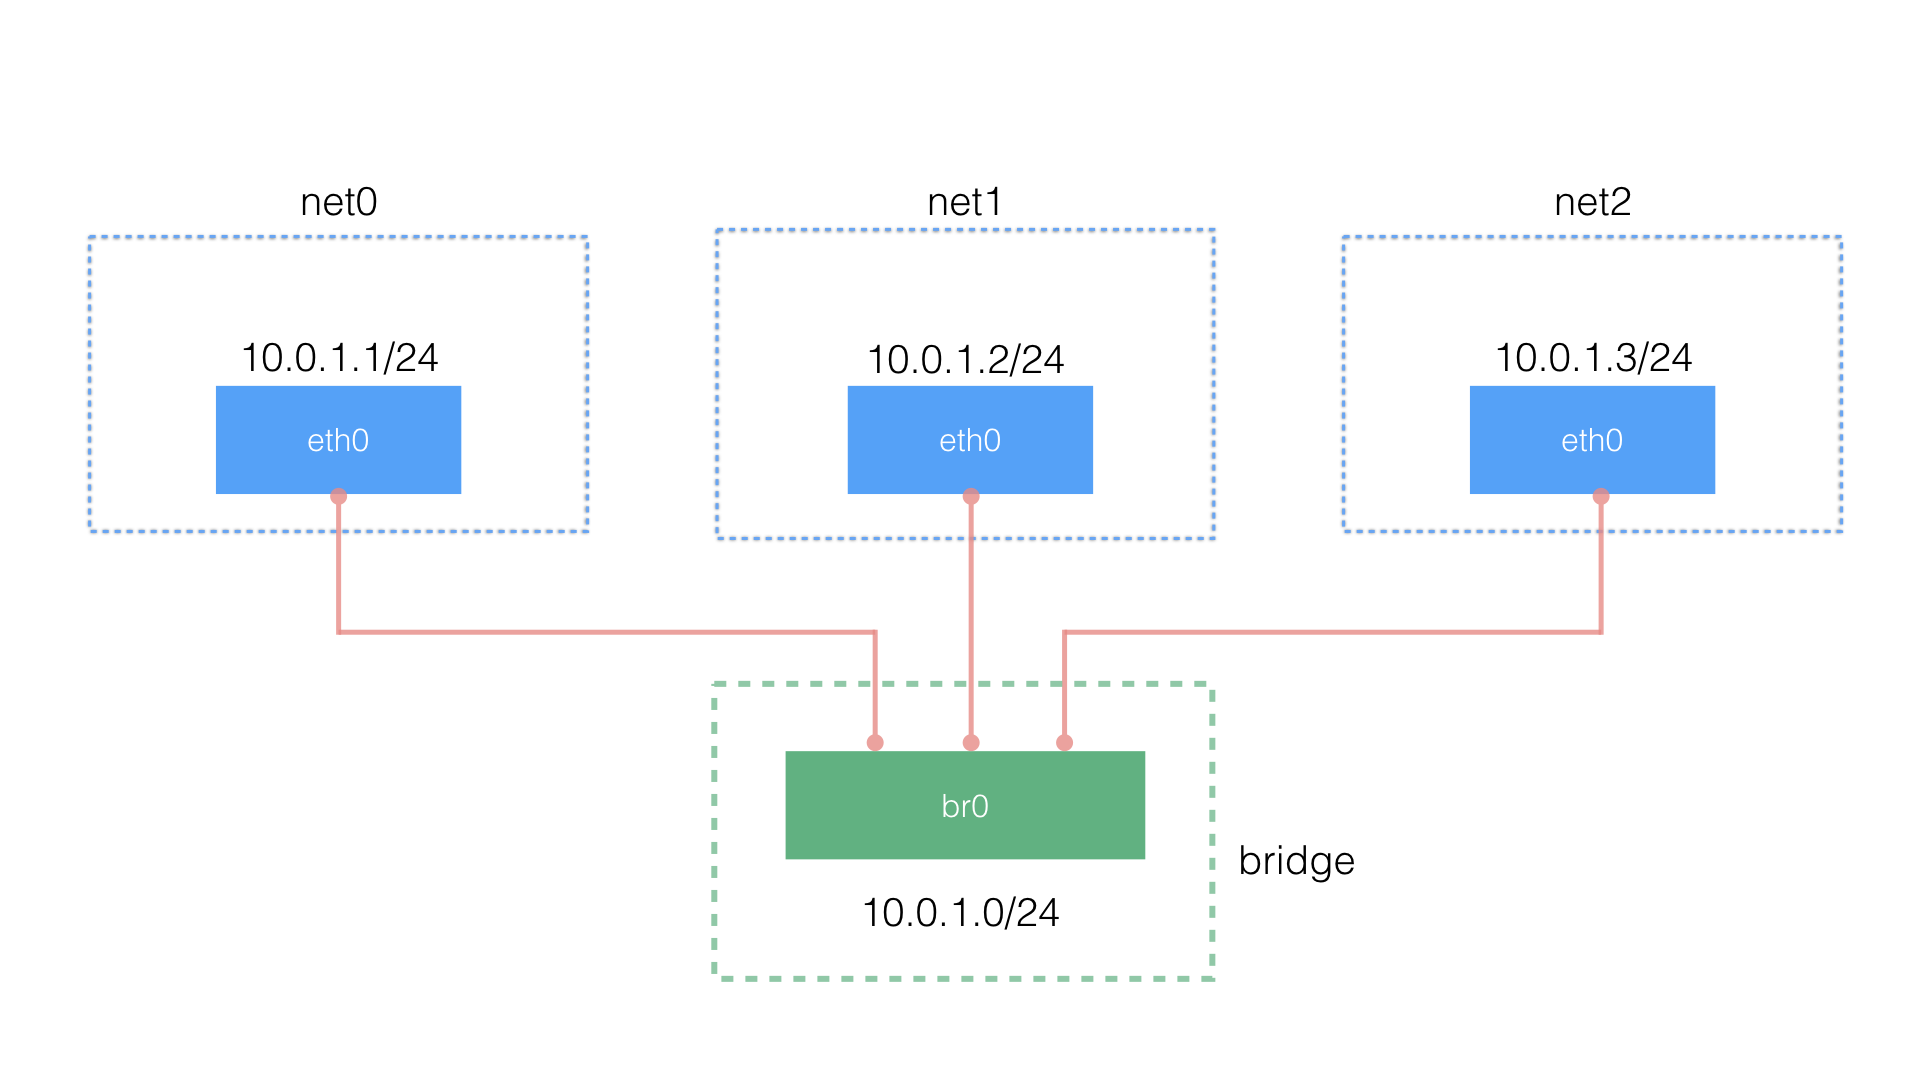
理想中的容器的网络环境应该如 docker 的桥接模型一样,如下:
TODO:: 实现上面模型
使用 Cgroup 限制容器的运行资源
cgroup 技术在 Linux 4.6 内核才内置,4.6以下的Linux需要安装 group-tools 工具,我电脑是 Arch Linux 4.19,于是直接使用 cgroup V1 API
以 unix 一切皆文件的哲学,调用 cgroup API 的过程,实践中是修改一些特殊文件的内容
#!/bin/sh

# 挂载一颗不和任何subsystem绑定的cgroup树
mkdir my_cgroup
#由于name=demo的cgroup树不存在,所以系统会创建一颗新的cgroup树,然后挂载到demo目录
mount -t cgroup -o none,name=my_cgroup my_cgroup ./my_cgroup

mkdir test
cd test

pid=`ps ax|grep -v grep|grep -w linux-container.out|awk '{print $1}'`

# 限制 cpu 资源
mkdir cpu
sh -c "echo ${pid} > cpu/cgroup.procs"
# 限制只能使用1个CPU(每250ms能使用250ms的CPU时间)
echo 250000 > cpu/cpu.cfs_quota_us
echo 250000 > cpu/cpu.cfs_period_us


# 限制 memory 资源
mkdir memory
sh -c "echo ${pid} > memory/cgroup.procs"
sh -c "echo 10M > memory/memory.limit_in_bytes"


# clean
rmdir cpu
rmdir memory
cd ../
# 移动 pid 到父目录,才可以删除 test 目录
sh -c "echo ${pid} > cgroup.procs"
rmdir test
# Linux重启后,挂载点会消失
测试例子:
- 使用 C 语言,调用 malloc 分配小块内存,观察分配到多少内存时程序暂停
- 执行死循环代码,通过 top -p $pid 观察cpu占用率